Showing posts with label InstaGram. Show all posts

Thursday, May 2, 2013

Last Queensday

On April 30th we celebrated our last Queensday. Next year it'll be Kingsday, which will be celebrated on a different date..
Kinda weird, since I've celebrated Queensdag since I was a little girl, actually: Since I was born...

Because of the coronation of our King, there were some extra festivities on the days prior.

Joshua's daycare invited all the kinds and parents/grandparents for a High-tea.

We decorated a pictureframe, had our picture taken and ate lots of sweets...
Joshua even played with the big boys...
I got lots of compliments on Joshua's crown, which I crocheted using this tutorial I found on Pinterest.


Tradition on Queensday are thriftmarkets. In Almere these start the evening before, so I went thriftshopping with Elisabeth and Rebekka. I only went for about an hour and a half, and haven't seen 3/4 of the market, but I scored BIGtime...!


Queensday itself was spent in Harderwijk, more thirifting, with my mom and cousin this time...


Love, Caroline

Saturday, November 3, 2012

Owl Hat and something matching

Remember the Owl Hat I made for Joshua last winter?

Guess what? It still fits...


Sorta...


Well, last winter I also promised someone I'd make a hat for her daughter to wear next winter.

I got a huge pile of clothes for Joshua, and the didn't want anything for it, just the hat.

I started on the hat, but then spring came, and summer. And I never finished the hat.
But when summer neared it's'end, the crocheting-itch started to come back and I picked up the owl project.
I felt kind of bad for taking so long, so I made a matching surprise.


I think the little lady looks very happy wearing this!


Thank you Mariella for letting me use this picture!

Love, Caroline

Friday, November 2, 2012

Ripple blanket

Last year I found a tutorial for a ripple blanket on Attic24... I was instantly in love and wanted to make an big blanket for Joshua, for when he get's a big-boy bed (that gives me PLENTY of time to finish it!)...

I started a test piece, which was really easy. I just started crocheting then, and it looked really hard, but really isn't....


After the testpiece, I felt confident, I picked 4 colors (initially 5, but the brown took away the vibrancy of the other colors...) and started crocheting. I can't remember how many stitches I chained and I made a few mistakes ending rows, so counting won't be really helpful... But believe me, there are a LOT!
The blanket is about 1,5 meters wide.

Progress is slow, I haven't crocheted a single row half of the spring and all summer, but I've picked it up again when the days started getting shorter and colder...
It is getting large enough that I can drape it over my legs and feel all warm and cozy while I work on more rows...
I intend to make it about two meters long, so when Joshua is all grown up he can still snuggle up under it...

Currently working on ripple number 23


Love, Caroline

Tuesday, October 30, 2012

Needle Felted AutumnLady

As I showed in this post, we have a very nice nature table (well, it's actually on top of a cabinet, but never mind).
But there are still some things missing...

I have always loved the nature tables an old friend of our had in her house, with loads of Waldorf-dolls she made herself.
I never got any further than sewing little gnomes from felt, with a pipecleaner base and wooden beads as a head, hands and feet. I've been making those since she tought me how to at the age of about 7, I think...
But when I got older and had already made a lot of them as gifts for grandma's and aunts, it wasn't fun anymore, so I stopped making them...

But since I started working in education, I always make nature / theme tables in my classroom and now that Joshua is getting bigger I want that in our home too. And not just with store bought decorations.

Since I learned sewing felt, I've also learned LOADS of other different crafts and needle felting is one Rebecca introduced me to.
So when I found these two amazing needle felted, Waldorf inspired dolls, I knew what I wanted to do...
Left                                       Right
click to go to the pin


After doing some research on how to get started, I combined this and this tutorial to make the base. I made the head and neck separately, as I was afraid the pipe cleaners would be visible. The head is very tightly felted, the body a little less tight and the skirt is very loosely felted. Only the underside is quite tightly done, to make it sturdy.


After I was satisfied with the rough base I made a dress by wrapping colored felt  in brown and yellow around the base and needling it in place. After that I started adding details and hiding little "mistakes" (little spots where the base was showing through).


When that was done, I added hair and a braided hairband (just to keep the hair in place, since is didn't really turn out how I wanted it initially).
I also gave her a scarf of sorts, since autumn is chilly.. I was was a bit torn in two about the pumpkin, I liked the idea of a broom for sweeping leaves, but since I wanted the whole tning finished and I didn't feel like going out in the dark to search for twigs, I made a little pumpkin anyway... Looks cute though.
The whole doll had a bit of a medieval feel to it, which I like...
I have always had a thing for medieval stuff and fantasy figures....
She makes me think of lady Marian in Robin Hood, the old Robin Hood with Kevin Cosner *sigh*...


I think she looks rather lovely "under" our tree... Don't you think so too...
Oh yes, I really need to thank my colleague and friend Elisabeth, since she provided me with roving for the base and a couple of colors, so that I didn't have to do, and wait, for an order of roving!

Love, Caroline

Sunday, October 28, 2012

Pepernotencake

Saw this on Pinterest and made my own version of it...
(Loaded with sugar and butter... :-S
And the name is actually wrong, it should be "kruidnotencake")


Preheat oven to 175C.
Butter a baking tin, or line it with bakingpaper.

Mix 200g butter with 200g sugar.
When creamy, mix in 4 eggs, one by one.
Then mix in 200g sifted selfraising flower.
Add a couple of tablespoons milk, to make the batter nice and moist.
Add one heaped tablespoon cookiespices
(Or of you don't have that (like I did, I ran out), mix the following ground spices:
1/10 white pepper
1/10 aniseed
1/10 cardamon
1/10 cloves
1/10 ginger
5/10 cinnamon
I did have these, since I use them when I bake spekkoek (Indonesian layered cake))

Mix in 125g "kruidnoten".

Pour the cakebatter in the bakingtin, put in in the middle of the oven and bake for 60-70 minutes.

Love, Caroline

PS: You could probably use any cakerecipe that makes a moist cake and add the "kruidnoten".
If you have a recipe for a moist cake with less of no sugar and less of no butter, PLEASE share it with me...

Thursday, October 25, 2012

Crocheted Toadstools

I found these really cool Toadstools on Pinterest.
It's a pattern in Dutch, by GrietjeKarwietje and she has loads more Dutch patterns.

But since I tough myself how to crochet via English tutorials, I'm not familiar with Dutch crocheting terminology.

I had a bit of a hard time figuring out what to do, but when I got a hang of it, the toadstool was finished fast.
Only: It's lumpy and has bumps where I decreased stitches...
I also didn't like the fact that the underside of the hood is red, real toadstools have white(ish) undersides...


So I started another toadstool and made the base larger, crocheted the underside white and broader and finished he hood in red.


I'm happier with this one, but still: Lumps where the decreases are...

And since you crochet round after round, without joining a row with a slip stitch  there is an awkward "dent" (can't find the right English word) where the white ends en the red starts.

After watching a Dutch video on YouTube, I figured out why I got lumps (Here is the English version). I didn't do the decreases the right way. That's what you get when you think you know how to do a stitch, deducing it from another stitch, but never actually look it up...

So I'm making another one.... Using what I know from crocheting Joshua's Owl-hat and applying that to this pattern.
I'm also trying to write out the pattern (using English crocheting terms, if anyone wants Dutch, let me know!).

That's it for now, I'll keep you updated on my Toadstool adventure!

Love, Caroline

Wednesday, October 24, 2012

Fall

I love autumn!

I love the colors
I love the shorter days
I love that those shorter days provide me with more time to burn candles
I love autumn produce
I love the falling leaves
I love the occasional summery day
I love the smell of the fresh rain

(There is also a lot about autumn I don't love, but hey, I'm opting for positivity!)

I also love to bring autumn in to our house.
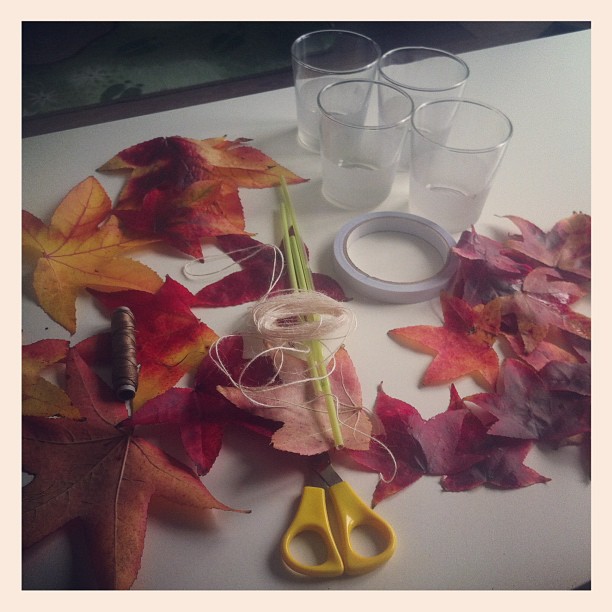
So I went outside and picked up loads of leaves.
We have these shrubs in the green area's in our street, which have leaves that turn the most amazing colors in the fall.
I'm press-drying a load of them for a school project, but I did some crafts with a bunch of them.


I made a garland by sticking pieces of drink straws to the back of the leaves with sticky tape. This way they hang nice and front facing when you string them.
I saw this on Pinterest, but can't find the original Pin anymore.


I also decorated some votives. Also found the idea on Pinterest.
They look so amazing when the candles are burning!


I think our nature/season table is nicely taking shape... The Loretta Grayson inspired tree fits in real nice!
I found the cute toadstool candle holders at Flying Tiger. Love that store...!


Now for some felted or crocheted toadstools and a felted harvestfairy (or something like that)...

Love, Caroline

Sunday, September 30, 2012

Spring Cleaning III & some Sewing

A small update on the office/guestroom.

I actually can see the floor again!
Threw a lot out, or put it in boxes. Where it belonged..!
And I have a little desk space, which is currently filled (again) with my sewing machine.

Finally got the sewing machine back to work, the thread kept breaking, but I fixed it... Yay me!

This is what I made.

Finally, no more searching for my crochet needles or a scissor.
Found the tutorial on Pinterest.

The flowerfabric is a scrap of Tilda I had left from the bedspread, the white is IKEA, also left over from the bedspread...

Love, Caroline
Saturday, August 11, 2012

Veggie Garden


It's been a while since I've written about my veggiegardenexperiment (nice scrabbleword!).

I've got a big amount of pictures for you. Some a big surprise, some sort of a big failure, but that's why it's an experiment. Next year I'm, obviously, changing some things...

Here we go:

Corn, only two seeds came up. I don't know what the
thing in the front is, but it doesn't look like all the other
weeds, so I'm leaving it where it is.

Currant, infested with aphids. Trying a natural repellant/
killer, using tomato leaves, I found on Pinterest tomorrow.


Grape. Not much to say, just happy it rooted.

Green chillies. I didn't thing these would work.
I planted them in a pot, 4 plants in one pot.
Not much earth for them, but about two weeks ago they
got flowers and now I have about 10 chillies already...!

Green peppers, same story as the chillies. Very surprised!

Herbs.
Left basket: Mint, parsley and chives. All doing very well.
Right basket: Oregano: doing well, dill: almost dead.
Basil: dead... A while already...


Right: Blackberry
Left: Raspberry being eaten, see picture below.
Under: Leftover Strawberryplants.
The Raspberry and Blackberry have a couple of flowers
at the moment, so maybe we'll get a little bit of fruit!
Close up of the caterpillars, can you see the little buggers?
Trying a natural repellant/killer, using garlic,
I found on Pinterest tomorrow.


Scallions, not a big succes yet, maybe if I disperse them,
they will be a succes.


Tomato plants. These are a HUGE surprise. Last year I had
one plant, which stayed small and gave two big,
green tomatoes that would turn red.
So this year I planted 4 sprouts, which grew into these
MONSTERS. And they are FULL.
Full of these: huge clusters of cherrytomatoes.
I'm already dreaming of loads of red, yummy, sweet tomatoes.
Of making fresh Pastasauce and Tomatoketchup, Jamie-style...  
Zucchini's. Green in the back, yellow in the front. These are
HUGE as well. Well, the green ones are, because I planted
them first. The yellow one was planted a lot later and
didn't grow as much.
I've had a lot of (baby)green zucchini's and I've seen a
picture of a zucchiniplant growing up, onto a support
of some sort, so they don't use a much "floorspace" as
they do now. I'm soooo trying that next year!
Appletree, we've planted it this year,
it has had three flower and it's growing three really tiny apples.
It's also infested with aphids.
Strawberries. Loads of them. Under the appletree.


What you didn't see in these pictures:
- The carrots that failed miserably, because I sowed them "under" the tomato-plants.
- The radishes I already harvested and were all kinds of weird shapes... :D
- Last years strawberryplants that didn't survive.
- The spinach which I still plan to test-sow in a pot, just to see how much space I'll need for that next year.
- The mulberry-trees. I actually have Mulberries, but I don't know what to do with them, so if anyone has idea's... Tell me..! Please...

As you can guess, I'm over the moon with my garden (which also has a lot of non-vegetable-or-fruit-plants in it).

Love, Caroline

Tuesday, July 24, 2012

PIF

I came across this topic on a couple of blogs I read.

PIF...
..
..
PIF?
..
..
PIF stands for Pay It Forward... Now that rings a bell...!

Remember the movie?
The idea is that you do something selfless for someone. That someone may in turn be inspired to do something selfless for someone else (or multiple someones...)

So when Rebekka asked if any of her readers was interested in a PIF, I didn't hesitate to respond...

Today I visited Rebekka (more on that in another blogpost) and I got my PIF...!
It is sooooooo gorgeous!
Rebekka knows we (Andries and I) love everything Whale and we love whaley-stuff for Joshua.
I could have guessed I would get a Whaley-PIF...


She made a Marble-bag with an embroidered whale. Inside was a felt whale which I can add to a shirt, bag or make a brooch from, a whale stamp, a stuffed whale (which Joshua LOVES! ! !) and a really cute small whale pin...

So now it's my turn to Pay It Forward...!
If there is anyone who is interested in receiving a small PIFpackage, let me know!
You don't have to have a blog to enter... You just have to like receiving a small gift and be open to the idea of maybe Paying It Forward...!

Love, Caroline


Sunday, May 13, 2012

Loretta Grayson

I feel like such a copycat...

I while ago I came across this pin. After clicking and clicking and clicking some more I endend up on Loretta Graysons blog.
All those colors made me sooooo happy... I also found her "tutorial", which show het process of creating her artworks. 

I originally wanted to create something similar with scrapbookpapers, but since my craftroom is such a mess (I'm not even close to finishing the reorganisation) and I didn't want to make a huge mess on our dinnertable, I decided to try out my Derwent pencils on canvas.
So I made a sketch and started coloring...

I blended every block with white spirit, so fill the canvas and make the colors more vibrant. I think I succeeded pretty well...

I did fill the trunk and the branches of the tree with black acrylic paint. First the whole thing with just black and after that dried, I applied different shades of grey.

When those layers dried I did the bark like Loretta does, with a very thin brush I made sort of circular patterns...
I'm still trying to figure out how I can create a bit of a grungy rim around the outside of the circle, without ruining the pencilwork.
I'm thinking of trying watercolor on a testpiece...
This week I need to buy some goldpaint for the "star"details.
I thought af adding the stars by glueing rhinestones on, but that'll probably be to much.
I'll be doing a combination of both...

So... Not the whole "artwork" is copied, but I still feel like a copycat...

Love, Caroline

Tuesday, May 1, 2012

Out with the old, in with the... old?

If you've read my previous post, this one might seem strange...

Yesterday was Queensday here in Holland. A national holiday with all kinds of festivities. Sort of a tradition for me, is to scour the "Vrijmarkten" (thriftmarkets) for all kinds of secondhand goodies.
Since we moved to Almere, the scouring starts the evening before Queensday, because the thriftmarkets start at 6PM here.
Queensday itself was spent in Harderwijk, where I grew up and my mom still lives.

Hubby went to Amsterdam with a friend and I hung Joshua in the ringsling for my shopping trip. He fell asleep after about an hour of looking at everything. So many new impressions...


This is what I scored:

Almere


Harderwijk


As you can probably guess, I am veeeery happy... Especially with the storehouse in the first picture and the vintage Acitivity Centre. They were such great finds!
(Most of the books (except for the Dick Bruna ones) are for the bookcrate at work)

Now I'm of to the couch for some crocheting-time...!

Love,

Caroline